An Angular phone number input component using Ionic Framework
Hi guys, it’s me again, and today I made something that might help someone who’s reading this in the future.
Have you ever seen an input field where it asks you to type your phone number? Maybe a website like Google has asked you to enter your phone number for 2FA? If so, you have probably seen something like this:
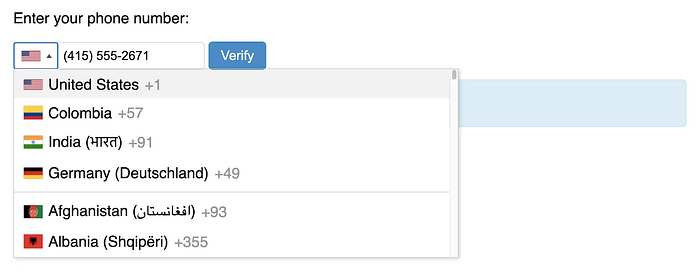
Do you recognize this input conrtrol? It’s the Twilio phone number input for international phone numbers. They have a guide on how to make one over here.
Here are the main features of this input:
- The most prominent feature is that there’s a country flag on the left of the input.
- If you click on it, then it shows a dropdown of country codes.
- All of this is embedded inside the input box so that it can be accessed along with the rest of the number.
This kind of field is most useful for getting a phone number to send a verification code to your phone. Now for unrelated reasons, I generally recommend you use a more secure kind of 2FA, but let’s say you wanted to implement this sort of thing in a Javascript framework.
Obviously in such a case, you would not use script tags like the Twilio component does, as script tags inside your components are considered bad design not only in Angular, but in other frameworks like React too. So this means you must split the code into three parts — an HTML part, a CSS part for styling, and a Javascript (Typescript for Angular projects) part that handles the logic.
Now this post could have been a guide on how to style your own input field, but I’m more of a Don’t-Repeat-Yourself kind of programmer. You need a UI library in order to get styled components, like Material UI, Angular Material, or Ionic Framework, and any of them will do the job. In this post I will use Ionic components, but you can adapt this to the other frameworks if you want.
The Design
As you can see, this component utilizes large inputs to make it mobile-friendly. This is an advantage over the Twilio phone number input. The one has a few, minor styling differences from the one that we will make, but the overall layout and functionality is the same.
Elements
First, we need a list of phone numbers and the associated text. This is the easiest part of the programming and, and although it is quite long (about 200 lines), you can access it here:
HTML
Next, we are going to design the HTML for the component. The phone number component has an an interesting design; it is essentially an<ion-select>dropdown inside an <ion-input>.
It might be tempting to use DevTools to inspect the children of these elements and create some CSS based on that to position the dropdown inside, but since these elements — along with most of the other Ionic components, are Shadow DOM elements, you cannot directly select the internal classes and elements of these stock components.
To work around this, Ionic Framework provides CSS Shadow Parts which are placed inside interior parts of the element and allows us to use :part() syntax to select that particular part. It’s worth noting that Shadow Parts are a web standard and not exclusive to Ionic.
In this particular case, we overload the label slot of the <ion-input> to place the <ion-select>dropdown on the left of the element. Everything else is straightforward.
CSS
On the (S)CSS side, we can position and size the phone number input as we like:
We make a few modifications to the default styling of the input and select elements to suit our needs:
- We size the labels appropriately so that they are vertically centered relative to the input.
- We also stretch the widths of the inputs so that they are long enough for the user to see the typed text.
- A sharper border is added. Padding is also added to the inputs so that the text isn’t clamped to the edge of the inputs.
- We use
pointer-eventsfor the inner<ion-select>to ensure that users can still click on it. Also we add a border on the right of it. - Inside the
<ion-select>, we make the badge slightly bigger so that it can be seen more clearly, and we trim the text so that only the flag is visible. - The text is also appropriately shrunken for small device form factors (e.g. phones), and invisible Ionic elements are deleted to reclaim valuable screen width.
This is actually SCSS, a variant of CSS used in Angular, but you can trivially convert it to CSS if necessary.
JS (or TS)
Finally, we need to add the logic for showing the correct flag when a phone number is entered. A first idea might be to check the country code at the beginning of the international phone number to see which country it corresponds to, but this approach has a few problems:
- Some countries share the same country code, e.g. USA and Canada both use +1 and are differentiated by area codes
- Some countries’ phone numbers are longer than others
- The user input might be invalid or blank
To avoid having to resolve all those problems ourselves, we use a library that specializes in parsing phone numbers. An example is libphonenumber-js, which I highly recommend and will use in this example.
Our phone number validation function will need to look something like this:
// Initialize the country code to make the dropdown blank
parsePhoneNumber() {
  if ( /* phone number is valid */ ) {
    // parse the phone number
    if ( /* country is valid */ ) {
      // Set the country code
    }
    else {
      // Clear the country code
    }
  }
  else {
    // Clear the country code
  }
}
Fortunately for us, libphonenumber-js comes with both a validation function and a parsing function that returns, among other things, the country which the phone number belongs to. From there, we can use the large mapping object we created earlier to gather the correct text from the -letter country code. This is hooked up in an [(ngModel)] so that it automatically updates the dropdown as well.
You can also manually select the country flag, but unlike in the Twilio component, this is only used for visual purposes. This is because our component makes you type the entire phone number with the international prefix.
So here is what the final code for the processing would look like:
So when you put these three elements together in a module, you should have a working phone number input component like the one in the screenshot.
I wanted to include a live demo so you could see it in action, but I can’t get Ionic Framework to work properly on Stackblitz, unfortunately — anyway, it should work if you follow the official instructions for creating a new Ionic project.
Questions? Let me know in the comments below. Thanks for reading!